• PLEASE NOTE - the TEAS facebook page has been hacked, take extreme care when visiting the page, for further information visit here

Need a little advice finishing off a DIY cage please

David&Carly

New Born Pup
Joined
Jun 27, 2018
Messages
58
Reaction score
48
Points
195
Location
South East London
Morning all, I hope you're all enjoying the weather.

Carly and I decided it would be better to build our own DIY piggy cage in readiness for a new friend for Bertie. It is bigger than the Furplast 140 cage we currently use so as to minimize potential squabbling between the two. The worse case scenario would be to halve the enclosure should they ultimately not get on.

Here are some progress pics. I hope they provide some inspiration on what can be done with a little bit of planning and minimal tools:

20180705_194209_resized.jpg
We started off with some pre-cut OSB from B&Q. Very inexpensive and they'll cut it for free. Just check they have the facility to do so as not all B&Qs offer this

20180705_194213_resized.jpg
Making the frame to strengthen things up and provide a mounting point for the legs.

20180705_201502_resized.jpg
The frame was joined using pocket holes so everything was concealed. This would be the underside of the house anyway so wouldn't be seen.

20180705_215401_resized.jpg
Attaching the legs. These were from eBay and were a little dear but they match other furniture we have in the house.

20180707_131702_resized.jpg
Reinforcing the frame and making sure everything is nice and flush ready for the board to lay on top.
20180707_133903_resized.jpg
Fitting the board

.20180707_194953_resized.jpg
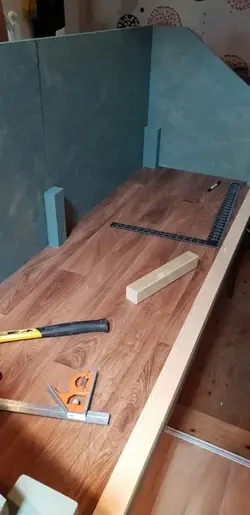
Fitting the back and side panels together with some uprights to reinforce things further. These uprights will provide the foundations for the upper platform. The angles on the sides were cut using a jigsaw but could easily be done with an ordinary wood saw.

20180707_195020_resized.jpg
Test fitting the top and bottom frame for the perspex.
20180708_130124_resized.jpg
First coat of paint on and cutting the vinyl to size......
 

Attachments

  • 20180708_133051_resized.jpg
    20180708_133051_resized.jpg
    54 KB · Views: 1
20180708_210857_resized.jpg
We siliconed the edges to stop wee from escaping down the cracks and getting to the wood beneath.

20180708_214650_resized.jpg
A couple of questions I have regarding making this even more piggy proof. Would it be a good idea to protect the corners of the wood with some sort of plastic angled edging? Not only would this stop them from nibbling at the wood but it would also protect from pig wee.

Also, how long should we wait for the paint fumes to disippate? The paint went on yesterday (Sunday) but still smells slightly strong this morning. I am tempted to give it a few days.

Any other advice people may have would be greatly appreciated!

Thanks you
David & Carly
 
Thank you for your reply Betsy :) The inspiration for the design came from another member on here also. I have learnt so much since joining these forums about our little furry friends.

I'm hoping to get some fleece liners as I've heard a lot of good things about them on here. I hope that along with the silicone and other bedding it will stop them from weeing into the corners and on the sides of the cage!
 
Wow, I am seriously impressed. i could never attempt anything like that :)) I am not a real man... no more nails is my friend... Seeing the process is really helpful

Yeah, piggies can be chewers good idea on the plastic I think, possible worth a try

In regards to fumes wait until they have totally gone. Piggies have very sensitive repository systems if we can smell it they will sense it far more.

We swear by the vinyl picnic sheets you can get from dunhelm to protect of correx, well carpet now as we use a giant run to house them in. So that may be worth using as the bottom layer to protect the bottom layer of cage

Looking great, thanks for sharing it in a thread, very lucky piggies!
 
I love all the pictures and seeing it all come together! I recently switched to vet bed and think it works better than fleece, I was sad to give up my cute printed fleece, but I reused it to make little lap pads and beds for them.
 
my advice would be at lest two weeks as the paint needs to cure, l've been busy painting my piggies hutch (see 'it's here') over the last three weeks using the same paint as you, wonn't be putting piggies in for yet another couple of weeks. l've lined mine with correx with page binders along the edges.👩‍🎨👩‍🔧
 
Wow, I am seriously impressed. i could never attempt anything like that :)) I am not a real man... no more nails is my friend... Seeing the process is really helpful

Yeah, piggies can be chewers good idea on the plastic I think, possible worth a try

In regards to fumes wait until they have totally gone. Piggies have very sensitive repository systems if we can smell it they will sense it far more.

We swear by the vinyl picnic sheets you can get from dunhelm to protect of correx, well carpet now as we use a giant run to house them in. So that may be worth using as the bottom layer to protect the bottom layer of cage

Looking great, thanks for sharing it in a thread, very lucky piggies!

Thanks, i'll give the plastic a try and will wait until all the fumes are gone before putting the cage to use. Thanks for the tip about the picnic sheets, I'll look for them. The bottom of the cage is covered in vinyl so this should be fairly resistant but another layer of protection would be quite good.

This looks awesome! Sorry I don’t have any advice for you, but may I ask what dimensions this is? I’m looking to make something similar for my two piggies :)

Of course! The dimensions are 2 metres long by 70cm wide. The pigs actual floorspace is a little under at around 190cm x 60cm. The front is 36cm high and the rear is getting on for 60cm high.

I love all the pictures and seeing it all come together! I recently switched to vet bed and think it works better than fleece, I was sad to give up my cute printed fleece, but I reused it to make little lap pads and beds for them.

Reusing the fleece is a great idea and I'll check out the vet bed also. Thank you.
 
my advice would be at lest two weeks as the paint needs to cure, l've been busy painting my piggies hutch (see 'it's here') over the last three weeks using the same paint as you, wonn't be putting piggies in for yet another couple of weeks.👩‍🎨👩‍🔧

I just saw your thread. It looks really good. I think you're right about the fumes though, the paint is really quite strong. Could you keep me updated on how the smell with yours goes please?
 
Thanks, i'll give the plastic a try and will wait until all the fumes are gone before putting the cage to use. Thanks for the tip about the picnic sheets, I'll look for them. The bottom of the cage is covered in vinyl so this should be fairly resistant but another layer of protection would be quite good.


Of course! The dimensions are 2 metres long by 70cm wide. The pigs actual floorspace is a little under at around 190cm x 60cm. The front is 36cm high and the rear is getting on for 60cm high.


Reusing the fleece is a great idea and I'll check out the vet bed also. Thank you.
Thank you so much! :)
 
Wow, I am seriously impressed. i could never attempt anything like that :)) I am not a real man... no more nails is my friend... Seeing the process is really helpful

If you (or anyone else for that matter) wanted any pointers then please do just let me know and I'd be more than happy to help. Getting the panels pre-cut saves a lot of hassle. The rest is fairly simple as long as you take things slow and measure carefully. I am by no means an expert when it comes to this sort of stuff either :)
 
If you (or anyone else for that matter) wanted any pointers then please do just let me know and I'd be more than happy to help. Getting the panels pre-cut saves a lot of hassle. The rest is fairly simple as long as you take things slow and measure carefully. I am by no means an expert when it comes to this sort of stuff either :)


the golden rule l was taurgt in both sewing and woodwork was,,measure twice and cut once.
 
Back
Top