kitkat1
Junior Guinea Pig
- Joined
- Sep 13, 2015
- Messages
- 123
- Reaction score
- 78
- Points
- 215

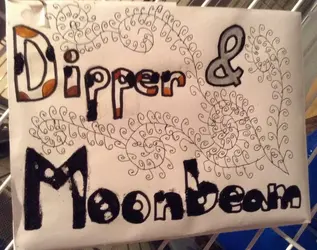
Hi! Here are some instructions for making this cute hangable name-tag for your piggies! You can hang it up on your guinea pigs' cage and it is really simple to create.
Materials:
Small square of cardboard
2-3 pieces of printer paper
Tape
Sharpie
Markers (any colors)
OPTIONAL:
Glitter
Modpodge or glue (to coat the glitter and prevent fallout)
Step 1:
The first step is to cut out a piece of cardboard. In the example shown up above, the cardboard is 5 inches tall and 7 inches wide, but you can go smaller or bigger.
Step 2:
The second step is to cover the cardboard with printer paper. You can leave the cardboard as it is and skip this step, but I like it better with a clean, white backround. You can do this by folding the paper around the cardboard and taping it. There is no right or wrong way to do this.
Step 3:
The third step is to pencil out your piggies' names, and then to outline them in sharpie. You can use bubble letters or regular letters.
Step 4:
The fourth step is coloring in the letters. I colored mine in by using colors in their fur coats. I did this so if anyone happen to walk by the cage and see the piggies, they would know that the white, brown, and black piggie is Dipper and the black and white piggie is Moonbeam. You can color this however you want, so be creative!
Step 5: (Optional)
Now you can add glitter to the name tag, which is optional. I added glitter to the black parts of the name tag, but you can't really tell in the picture. If you add glitter, it is a good idea to add on modpodge or glue to prevent fall out and add shine.
Step 6: (Also optional)
I also added a little swirly design to fill in the big empty space between the names. This is optional and you can be creative and do whatever design you want.
Step 7:
The last step is to punch a hole in the name tag and loop a string through it so you can hang it on the cage, Sometimes the cardboard will be too thick to punch a hole through, so you can tape the string to the cardboard if this happens. Once you do this, your DIY name tag will be finished!
I really like making these because you can incorporate your pets' personality into the name tag! If you decide to make this, please post a pic down below. Thanks!
Hope you enjoy!
